Blazor Basics Testing Blazor Components With Bunit
Blazor Basics: Testing Blazor Components with BUnit #
Excerpt #
Learn how to set up bUnit and implement an interactive Blazor component test.
Learn how to set up bUnit and implement an interactive Blazor component test.
In modern software development, automated testing is one of the pillars of solid software quality. When it comes to testing business logic, we have unit tests, and we learned how to invert dependencies (inversion of control) and mock dependencies in tests.
When it comes to user interface development, we often rely on browser-based tests. Those tests are usually more complex to implement and much slower in execution because they render the whole website or component and, therefore, need to initialize an entire browser engine.
For Blazor development, bUnit offers a compelling alternative. bUnit allows us to implement Blazor component tests and execute them using the unit testing framework of our choice (MsTest, Nunit, xUnit), similar to a regular unit test in a blazingly fast way.
In this article, we learn how to set up and use bUnit to test Blazor components conveniently.
You can access the code used in this example on GitHub.
Setting Up a bUnit Test Project #
For this example, I assume we have a Blazor web application based on the Blazor Web Application project template available from .NET 8.
We create a MsTest test project and add it to the solution containing the Blazor web application.
Hint: I usually name my test projects the same as the project under test and add a .Tests suffix.
Next, we want to install the bUnit NuGet package to the test project. You can use the NuGet Package Manager or the following command in the NuGet Package Manager console:
dotnet add package bunit
When writing this article, I noticed that the package already has over 5 million downloads and is actively maintained.
Hint: Even though this example assumes a .NET 8+ Blazor web application under test, bUnit works starting with .NET 5 and later versions.
Next, we want to add a project reference from the test project to the Blazor web application we want to test.
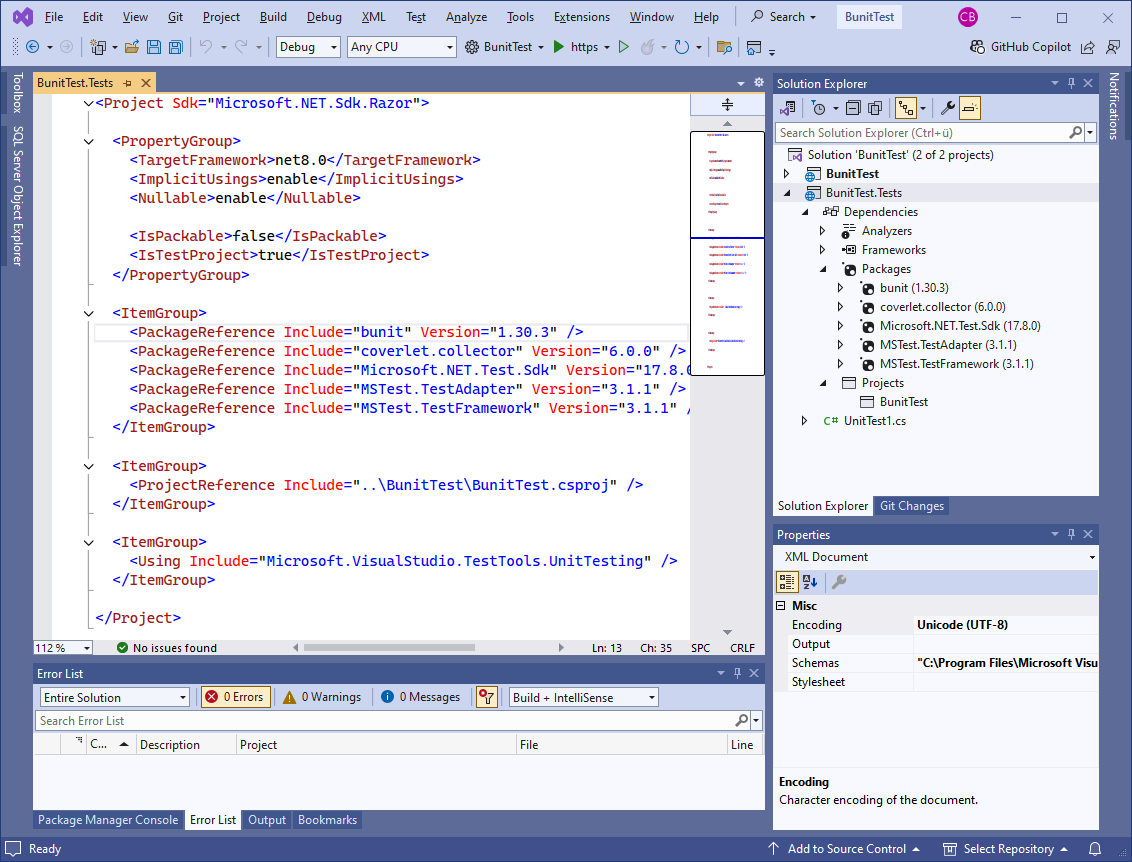
There is an important configuration we have to make for the test project to be able to run correctly. We need to open the project file (.csproj) and set the SDK to Microsoft.NET.Sdk.Razor.
The project file looks like this when using MsTest as the unit testing framework:
Notice the SDK specified on the first line, the bunit package (the first package reference), and the project reference to the BunitTest project (the Blazor web application).
Hint: There is also the option to install a bUnit project template and create a project based on a template instead of manually setting it up.
Creating a bUnit Test in a Razor File #
The first step in being able to write tests in .razor file was to set the project’s SDK type to Microsoft.NET.Sdk.Razor. Another preparation step is to create an _Imports.razor file similar to a real Blazor project.
In the _Imports.razor file in the test project, we insert the following using statements:
Notice the last line where I add a using statement to the Components namespace of the Blazor application. In my case, I named the application under test BunitTest, as shown earlier in this article.
If you are using a different testing framework than MsTest, you might also want to add a using statement for it in the _Imports.razor file.
bUnit requires a new TestContext for each test run. However, MsTest and NUnit only create a test class once. Therefore, we need to implement the following helper class:
We can then use the BunitTestContext class to define our bUnit tests in .razor files.
Hint: When using xUnit, this step does not apply because xUnit instantiates a new class for each test execution.
Now, let’s create a simple MyName component in the Blazor project with the following code:
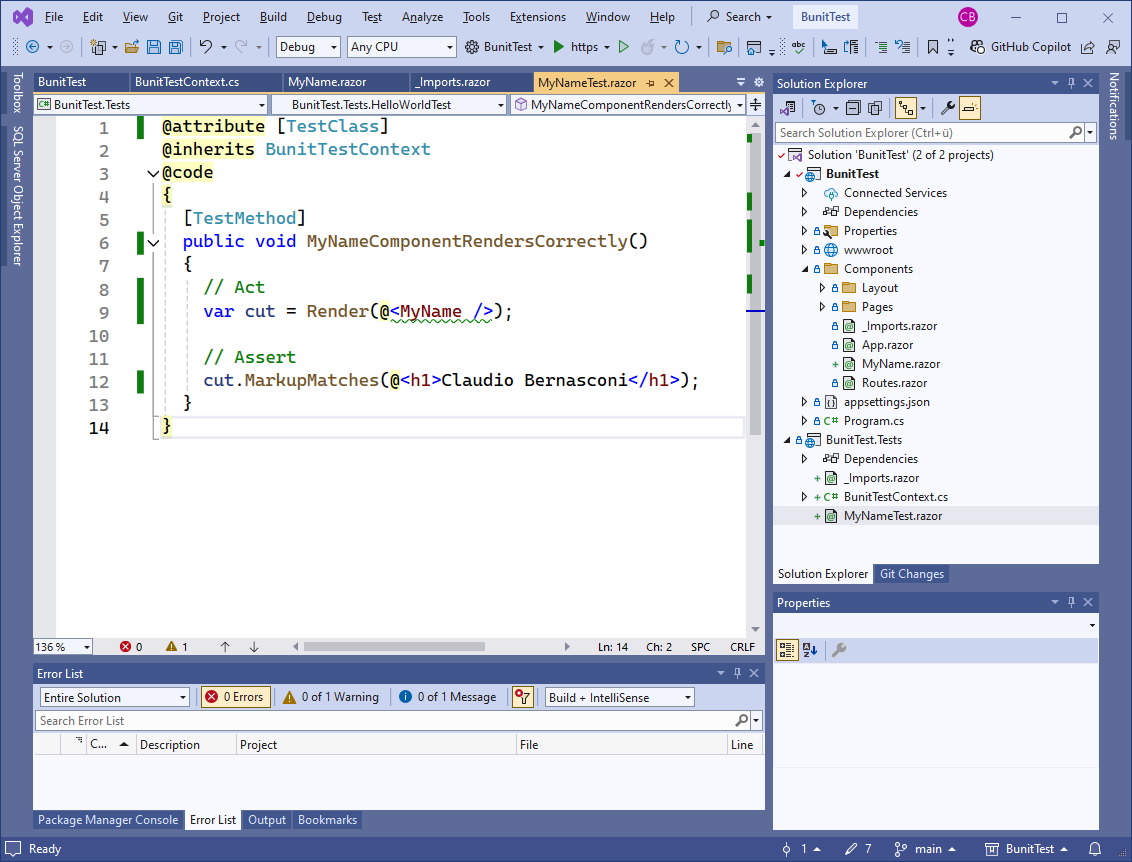
It’s a simple component that renders static HTML. In the test project, we add another .razor file named MyNameTest.razor and insert the following test definition:
This is a basic bUnit test using MsTest. It uses the @attribute Razor directive to add the MsTest-specific TestClass attribute to the test class.
Next, we inherit from the BunitTestContext class we previously implemented.
In the @code block of the test, we define a method and name it according to out test case. In this case, we want to verify that the MyName component renders correctly. We use the Render method from the Bunit package and provide the MyName component.
We then use the MarkupMatches extension method on the cut (short for component under test) variable, which contains a reference to the rendered MyName component. As the method argument, we provide the expected HTML markup.
The project structure and the implemented test now looks like this:
We then use the Test Explorer in Visual Studio or the command line to run the tests in the Bunit.Tests project.
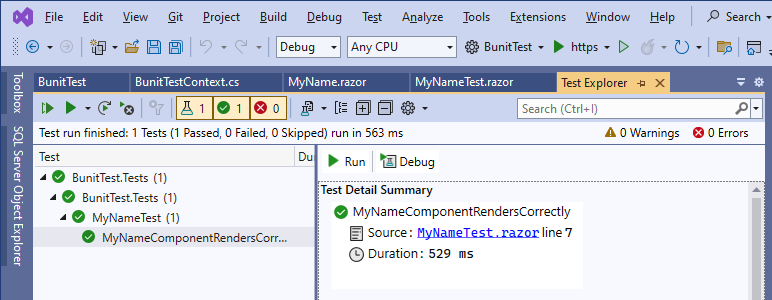
If everything works as expected, you should be able to see a successful test execution.
Otherwise, bUnit usually provides a detailed and helpful error message that leads you to the cause of a failed test execution.
Creating an Interactive bUnit Test #
The first example verified a static HTML rendering component. In this second example, we want to implement a test for an interactive component.
Consider the following interactive Blazor component. I name it RandomNumberGenerator and put it in the Components folder of the BunitTest project (the Blazor application).
We have a short component template where we render a number that is randomly generated when the user presses a button.
Now, let’s add a new test file to the BunitTest.Tests project and name it RandomNumberGeneratorTest.razor with the following code:
First, we use the generic version of the Render method to provide the type of the Blazor component under test, in this case, RandomNumberGenerator.
We then use the Find method on the rendered component to find the button and use the Click method to perform a button click on the Generate button.
We can now use the Instance property on the cut variable to verify that the value of the Number property is between 1 and 99.
Using the generic variant of the Render method and declaring the cut variable of type IRenderedComponent<RandomNumberGenerator> we get access to the component’s state and are able to verify its value.
This test somewhat scratches the surface of what is possible with bUnit.
How Does bUnit Work? #
Now that we have learned how to set up and use bUnit to test Blazor components, we will look at how bUnit works under the hood.
We can either use .cs or .razor files to implement bUnit tests for Blazor components. The most important advantage of using a .razor file is that we can declare markup.
However, .cs files provide better editing support for implementing unit tests. I usually choose what suits me for each individual test.
When the tests run, Blazor components are rendered, and they live through their lifecycle, similar to when they run in a real Blazor application. We can provide input, and components can output data, or both.
The magic happens in bUnit’s TestContext type.
Limitations of bUnit #
Currently, there is no ability to run JavaScript from a component under test when using bUnit. However, a workaround in the bUnit documentation explains how to emulate the IJSRuntime type.
bUnit renders the components under test using a test context. For some complex rendering scenarios it might not be accurate. However, I personally haven’t hit this limitation and opted to simplify my component implementation whenever I faced difficulties in testing.
Since the test context uses a headless approach, it cannot account for browser-specific rendering behavior.
A limitation I have previously faced myself is testing components that have complex logic inside lifecycle methods, especially when they have side effects. It’s one of the reasons I limit behavior in lifecycle methods as much as possible and put most of my logic in services.
Conclusion #
We learned how to render a component and verify its HTML markup. We also learned how to access the component’s state and verify its value, as well as how to interact with a Blazor component (by clicking a button).
We could only scratch the surface in this introductory article about implementing Blazor component tests using bUnit.
There is so much more we can do with bUnit. For example, we can inject services into components under test or pass parameters to components.
I highly recommend trying it yourself to find out the different options. bUnit is a tool in my toolbelt that I don’t want to miss when developing business applications using Blazor.
If you want to learn more about Blazor development, you can watch my free Blazor Crash Course on YouTube. And stay tuned to the Telerik blog for more Blazor Basics.