6 Unique and Lesser Known Go Techniques by Dad Cod Jun, 2024 Medium
6 unique and lesser-known Go techniques | by DadCod | Jun, 2024 | Medium #
Excerpt #
First, let’s talk about Go’s generate command. This tool automates code generation, saving you time and reducing mistakes. With go generate, you can add special comments in your code to run specific…
[

]( https://medium.com/@dadcod?source=post_page-----9821be24972b--------------------------------)

Today, we’re exploring 6 unique and lesser-known Go techniques.
If you are not into the mood for reading:
Generate #
First, let’s talk about Go’s generate command. This tool automates code generation, saving you time and reducing mistakes. With go generate, you can add special comments in your code to run specific commands, which is great for creating boilerplate code.
<span id="4a7d" data-selectable-paragraph=""><br><span>type</span> Status <span>int</span><br><br><span>const</span> (<br> Active Status = <span>iota</span><br> Inactive<br> Pending<br>)</span>
In this example, the //go:generate comment tells the Go tool to run the stringer command, which generates a string representation for the Status constants. This can be incredibly useful when you need a consistent way to convert constants to their string values throughout your codebase.
<span id="7bcd" data-selectable-paragraph=""><br><span>type</span> MyInterface <span>interface</span> {<br> DoSomething(param <span>string</span>) <span>error</span><br>}</span>
In this example, the //go:generate comment runs the mockgen tool to generate a mock implementation of MyInterface. This is very useful for testing, as it allows you to create mock objects automatically.
<span id="e95d" data-selectable-paragraph="">//go:generate protoc --go_out=. --go-grpc_out=. myproto.proto</span>
Here, //go:generate runs the protoc command to compile Protocol Buffers definitions into Go code. This is essential for applications that use gRPC for communication.
One more thing about generators: I found this cool article that discusses how to manage your tool versions. We receive an error if we don’t pre-install the stringer command, for example. One approach is to have a Makefile task that parses the tools.go file and installs those dependencies.
<span id="0070" data-selectable-paragraph=""><br>GO_BIN := <span>$(<span>shell</span> which go)</span><br><br><br><span>install-tools:</span><br> @echo <span>"Parsing tools.go and installing dependencies..."</span><br> @go list -f '{{range .Imports||{{.|| {{end||' tools.go | xargs -t -n 1 <span>$(GO_BIN)</span> install<br> @echo <span>"All tools have been installed."</span><br><br><span><span>.PHONY</span>: install-tools</span></span>
Alternatively, because we’ve already pinned the dependencies and their versions in our go.mod file, we can achieve this through the declaration in the tools.go file.
<span id="b93c" data-selectable-paragraph=""><br><br><br><span>package</span> main<br><br><span>import</span> (<br> _ <span>"golang.org/x/tools/cmd/stringer"</span><br>)</span>
This brings us to the next technique:
Build tags #
Build tags provide a powerful way to include or exclude files from the build process based on specific conditions. They can be particularly useful for managing different build environments or conditional compilation. Let’s dive into how build tags work and how they can be used effectively in your Go projects.
Build tags are special comments in Go that control when a file should be included in the package. In this case:
- New syntax
This line is the modern syntax for build tags introduced in Go 1.17. It specifies that the file should be included when the tools build tag is set.
- Old syntax
This line is the legacy syntax for the same build tag, ensuring compatibility with older versions of Go.
<span id="a074" data-selectable-paragraph=""><br><br><span>package</span> main<br><br><span><span>func</span> <span>main</span><span>()</span></span> {<br> fmt.Println(<span>"This code runs only on Linux"</span>)<br>}</span>
In this example, the // +build linux tag at the top of the file ensures that this code is only included in the build process when targeting Linux. This allows you to maintain platform-specific code separately and avoid cluttering your codebase with conditionals.
You can also use custom build tags like // +build debug to include or exclude code based on custom conditions. This is useful for including debug or testing code without affecting the production build.
<span id="2e92" data-selectable-paragraph=""><br><br><span>package</span> main<br><br><span>import</span> <span>"fmt"</span><br><br><span><span>func</span> <span>main</span><span>()</span></span> {<br> fmt.Println(<span>"Debugging mode enabled"</span>)<br>}</span>
Consider developing a cross-platform application that needs to handle platform-specific functionalities, such as file handling or system calls. Using build tags, you can maintain clean and organized code by separating platform-specific implementations into different files. This approach ensures that only the relevant code is included during the build process for each target platform, reducing the risk of platform-specific bugs and simplifying maintenance.
Functional Options Pattern #
Next, let’s explore the Function Options pattern.
Consider developing a web server framework where users need to configure various parameters like host, port, timeouts, and security settings. The Function Options pattern allows users to specify only the options they care about, providing default values for the rest. This makes your API user-friendly and reduces the risk of breaking changes if new configuration options are added in the future.
This pattern provides a flexible way to handle configuration in your functions and constructors. Instead of creating multiple constructors or using complex parameter lists, the Function Options pattern allows you to use options as functions that modify the configuration of your struct.
<span id="728c" data-selectable-paragraph=""><span>type</span> Server <span>struct</span> {<br> Host <span>string</span><br> Port <span>int</span><br>}<br><br><span>type</span> Option <span><span>func</span><span>(*Server)</span></span><br><br><span><span>func</span> <span>WithHost</span><span>(host <span>string</span>)</span></span> Option {<br> <span>return</span> <span><span>func</span><span>(s *Server)</span></span> { s.Host = host }<br>}<br><br><span><span>func</span> <span>WithPort</span><span>(port <span>int</span>)</span></span> Option {<br> <span>return</span> <span><span>func</span><span>(s *Server)</span></span> { s.Port = port }<br>}<br><br><span><span>func</span> <span>NewServer</span><span>(opts ...Option)</span></span> *Server {<br> server := &Server{Host: <span>"localhost"</span>, Port: <span>8080</span>}<br> <span>for</span> _, opt := <span>range</span> opts { opt(server) }<br> <span>return</span> server<br>}<br><br><span><span>func</span> <span>main</span><span>()</span></span> {<br> server := NewServer(WithHost(<span>"example.com"</span>), WithPort(<span>9090</span>))<br> fmt.Printf(<span>"Server running at %s:%d\n"</span>, server.Host, server.Port)<br>}</span>
In this example, we have a Server struct with default values for Host and Port. The Option type is a function that modifies the server configuration. Functions like WithHost and WithPort return these options, which can then be passed to the NewServer function to customize the server’s configuration. This pattern is very clean and makes it easy to add new configuration options without breaking existing code.
Comparing to the Builder Pattern
Now, let’s compare the Function Options pattern with the Builder pattern, which is commonly used in languages like Java. The Builder pattern involves creating a separate Builder struct to handle the configuration and then constructing the final object. Here’s how it looks in Go:
<span id="404b" data-selectable-paragraph=""><span>package</span> main<br><br><span>import</span> (<br> <span>"fmt"</span><br>)<br><br><br><span>type</span> Server <span>struct</span> {<br> Host <span>string</span><br> Port <span>int</span><br>}<br><br><br><span>type</span> ServerBuilder <span>struct</span> {<br> host <span>string</span><br> port <span>int</span><br>}<br><br><br><span><span>func</span> <span>NewServerBuilder</span><span>()</span></span> *ServerBuilder {<br> <span>return</span> &ServerBuilder{<br> host: <span>"localhost"</span>,<br> port: <span>8080</span>,<br> }<br>}<br><br><br><span><span>func</span> <span>(b *ServerBuilder)</span></span> SetHost(host <span>string</span>) *ServerBuilder {<br> b.host = host<br> <span>return</span> b<br>}<br><br><br><span><span>func</span> <span>(b *ServerBuilder)</span></span> SetPort(port <span>int</span>) *ServerBuilder {<br> b.port = port<br> <span>return</span> b<br>}<br><br><br><span><span>func</span> <span>(b *ServerBuilder)</span></span> Build() *Server {<br> <span>return</span> &Server{<br> Host: b.host,<br> Port: b.port,<br> }<br>}<br><br><span><span>func</span> <span>main</span><span>()</span></span> {<br> builder := NewServerBuilder()<br> server := builder.SetHost(<span>"example.com"</span>).SetPort(<span>9090</span>).Build()<br> fmt.Printf(<span>"Server running at %s:%d\n"</span>, server.Host, server.Port)<br>}</span>
In this example, the ServerBuilder struct is responsible for configuring and constructing the Server. Each configuration method, like SetHost and SetPort, returns the builder itself, allowing for method chaining. Finally, the Build method constructs the Server instance with the configured values.
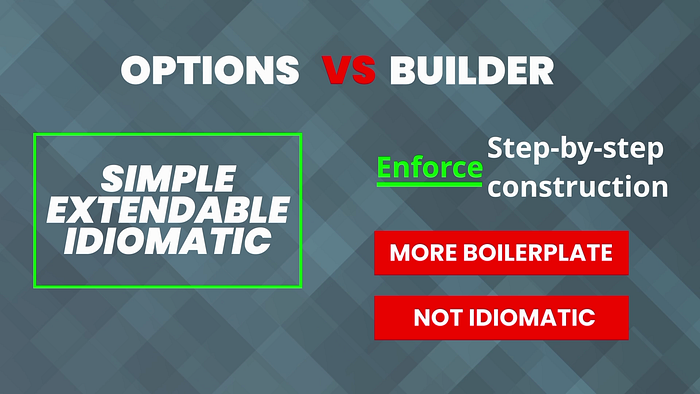
Choosing between these patterns depends on the specific needs of your project. For most Go applications, the Function Options pattern is more idiomatic and aligns well with Go’s simplicity and flexibility.
Error Wrapping #
Imagine you’re developing a microservice that interacts with multiple external services, like a database and a third-party API. When an error occurs, simply returning the error isn’t helpful for diagnosing the root cause. By wrapping errors, you can provide a clear and detailed context of what operation failed and why, which is crucial for debugging and maintaining reliable services.

Error handling is crucial in any programming language, and Go makes it easy with its built-in error type. However, simply returning errors isn’t always enough. You often need to provide context for what went wrong. This is where error wrapping with fmt.Errorf comes in handy. It allows you to add context to your errors, making debugging much easier.
<span id="b7b7" data-selectable-paragraph=""><span><span>func</span> <span>doSomething</span><span>()</span></span> <span>error</span> {<br> err := someFunction()<br> <span>if</span> err != <span>nil</span> {<br> <span>return</span> fmt.Errorf(<span>"doSomething failed: %w"</span>, err)<br> }<br> <span>return</span> <span>nil</span><br>}</span>
In this example, if someFunction returns an error, we wrap it with additional context using fmt.Errorf. The %w verb is used to include the original error. This wrapped error provides a complete picture of what went wrong, making it easier to trace the source of the problem.
<span id="f2b6" data-selectable-paragraph=""><span><span>func</span> <span>fetchData</span><span>(url <span>string</span>)</span></span> ([]<span>byte</span>, <span>error</span>) {<br> resp, err := http.Get(url)<br> <span>if</span> err != <span>nil</span> {<br> <span>return</span> <span>nil</span>, fmt.Errorf(<span>"failed to fetch data from %s: %w"</span>, url, err)<br> }<br> <span>defer</span> resp.Body.Close()<br><br> data, err := ioutil.ReadAll(resp.Body)<br> <span>if</span> err != <span>nil</span> {<br> <span>return</span> <span>nil</span>, fmt.Errorf(<span>"failed to read response body: %w"</span>, err)<br> }<br> <span>return</span> data, <span>nil</span><br>}</span>
In this example, network and I/O errors are wrapped with context that includes the URL being accessed, providing more useful error messages.
Using Context for Cancellation #
Imagine you’re developing a web server that handles incoming HTTP requests. Some requests might involve long-running operations, such as querying a database or calling an external API. Using context for cancellation, you can gracefully handle client cancellations (e.g., if the user navigates away from the page) and avoid wasting resources on operations that are no longer needed. This improves the efficiency and responsiveness of your server.
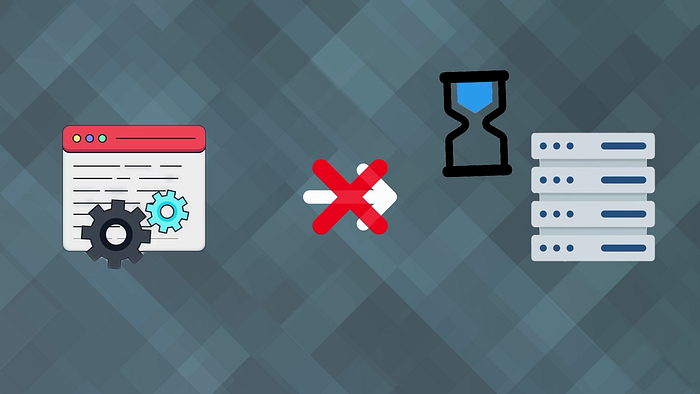
The context package is an essential tool for managing cancellations and timeouts in concurrent Go programs. By passing a context through your functions, you can signal cancellation across goroutines and control the lifespan of operations. This improves resource management and ensures that your application can respond to changes promptly.
<span id="0b20" data-selectable-paragraph=""><span><span>func</span> <span>main</span><span>()</span></span> {<br> ctx, cancel := context.WithCancel(context.Background())<br> <span>defer</span> cancel()<br><br> <span>go</span> <span><span>func</span><span>()</span></span> {<br> time.Sleep(<span>2</span> * time.Second)<br> cancel()<br> }()<br><br> <-ctx.Done()<br> fmt.Println(<span>"Operation canceled:"</span>, ctx.Err())<br>}</span>
In this example, we create a context with a cancel function. A goroutine simulates some work and then calls cancel to signal that the operation should be canceled. The main function waits for the context to be canceled and then prints the cancellation error. This pattern allows you to handle cancellations gracefully and avoid wasting resources on unnecessary operations.
<span id="82ef" data-selectable-paragraph=""><span><span>func</span> <span>main</span><span>()</span></span> {<br> ctx, cancel := context.WithTimeout(context.Background(), <span>2</span>*time.Second)<br> <span>defer</span> cancel()<br><br> <span>select</span> {<br> <span>case</span> <-time.After(<span>3</span> * time.Second):<br> fmt.Println(<span>"Operation timed out"</span>)<br> <span>case</span> <-ctx.Done():<br> fmt.Println(<span>"Context canceled:"</span>, ctx.Err())<br> }<br>}</span>
Using context.WithTimeout, you can set a timeout for operations. If the operation takes longer than the specified time, the context will be canceled automatically.
<span id="3522" data-selectable-paragraph=""><span><span>func</span> <span>main</span><span>()</span></span> {<br> deadline := time.Now().Add(<span>2</span> * time.Second)<br> ctx, cancel := context.WithDeadline(context.Background(), deadline)<br> <span>defer</span> cancel()<br><br> <span>select</span> {<br> <span>case</span> <-time.After(<span>3</span> * time.Second):<br> fmt.Println(<span>"Operation timed out"</span>)<br> <span>case</span> <-ctx.Done():<br> fmt.Println(<span>"Context canceled:"</span>, ctx.Err())<br> }<br>}</span>
Similarly, context.WithDeadline allows you to set a specific time at which the context will be canceled, providing even more control over your operations.
JSON Tagging for Structs #
Imagine you’re building a RESTful API that returns user data. Some fields, like passwords or internal IDs, should not be exposed to clients for security reasons. By using JSON tags, you can control the visibility of struct fields, ensuring that sensitive information is never sent in the API response. This approach helps maintain data privacy and security while providing a clean and consistent API interface.
Customizing JSON encoding and decoding with struct tags can give you precise control over how your data is marshaled and unmarshaled. This is particularly useful for APIs where you need to ensure that the JSON output matches specific requirements and excludes sensitive information.
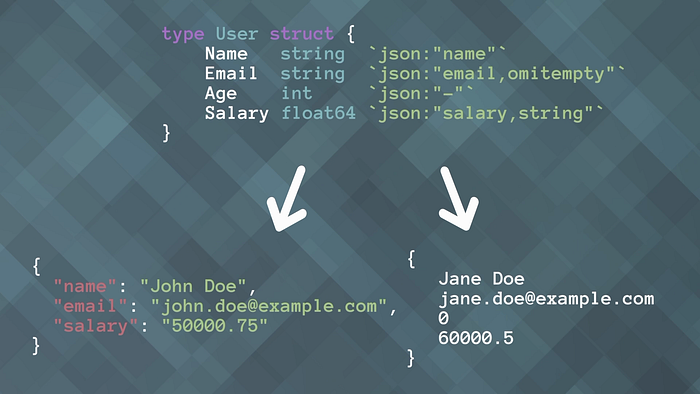
<span id="fa27" data-selectable-paragraph=""><span>type</span> User <span>struct</span> {<br> Name <span>string</span> <span>`json:"name"`</span><br> Email <span>string</span> <span>`json:"email,omitempty"`</span><br> Age <span>int</span> <span>`json:"-"`</span><br>}<br><br><span>type</span> APIUser <span>struct</span> {<br> User<br> Status <span>string</span> <span>`json:"status"`</span><br>}<br><br><span><span>func</span> <span>main</span><span>()</span></span> {<br> user := User{Name: <span>"John Doe"</span>, Email: <span>"john.doe@example.com"</span>, Age: <span>30</span>}<br> apiUser := APIUser{User: user, Status: <span>"active"</span>}<br><br> jsonData, err := json.Marshal(apiUser)<br> <span>if</span> err != <span>nil</span> {<br> fmt.Println(err)<br> <span>return</span><br> }<br><br> fmt.Println(<span>string</span>(jsonData))<br>}</span>
In this example, the User struct has JSON tags that control which fields are included in the JSON output. The Email and Age fields use the omitempty and - tags, respectively, to conditionally include or exclude them. The APIUser struct embeds User and adds a Status field, allowing you to customize the JSON output for different contexts.
Additional Useful JSON Tags:
**omitempty**: Omits the field from JSON if it has an empty value (zero value for the type).**-**: Completely excludes the field from JSON encoding and decoding.**json:"name,string"**: Encodes/decodes the field as a JSON string, useful for numeric fields that need to be strings in JSON.**json:"name,omitempty,string"**: Combinesomitemptyand string encoding/decoding.
Conclusion #
That’s it for our 6 unique Go techniques! By incorporating these into your projects, you’ll write more efficient, idiomatic, and powerful code. If you enjoyed this article, give it a clap, and don’t forget to subscribe. Check out my youtube channel where there is a video version!